What is a Randall you may ask? Back around 2002,
Dogfish Head Brewing figured out how to turn a filter housing into a device that could infuse beers with various ingredients as they were being poured. They named this genius device "Randall the Enamel Animal", and the when they actually started building them for the beer industry the name stuck. The original Randall stirred up the beer world quite a bit, but it did have a pretty serious flaw; that being that it foamed, a lot!
So, in 2010 they set out to re-design the Randall to address the foaming issue. What ended up working was to add a second "de-foaming" chamber, which can be surrounded by ice, and a flow control faucet to balance the beer flow on the way out.
Now, you can buy these pre-built, directly from Dogfish Head for (at the time of writing)
$298.00. While this is great for commercial breweries and some heavy pocketed home brewers, we have to face that fact that most of us home brewers are cheap and always looking for ways to save as much money as possible.
That's where my motivation to build this myself came in.
Before this whole thing started, I had just purchased two filter housings from Amazon to filter a problematic beer that I had recently brewed (long story!).
After filtering that beer though, I had two filter housings just sitting there doing nothing. Being that I will likely very rarely, if ever, have the need to filter another beer, I started thinking of what else I could use them for.
This led me to look into the design of the Randall 3.0.
I ended up finding the users guide that ships with it, which also included a full parts list (attached below). After researching each part and their pricing, I did find that Dogfish Head definitely does not make much money on selling them. But I knew I could do it much cheaper!
The Filter Housings:
The two housings that I had, were bought from Amazon for around $15 using my Prime account. They are
Pentek Model 158117.
The housings you buy do play into your cost savings here, as they have 1/4" NPT threads for the inputs and outputs. This cuts cost on having to adapt the 1/2" or 3/4" NPT threads on the filters that you'd typically find at your local hardware store, down to something you can attach a beer line to.
The housings do have pressure relief valves (PRV's), but for the Randall, they are not used, and they don't affect anything being there, either. It may be possible to find the same housings without PRV's for less money, and if you can, I would definitely go with them if they save you a couple of dollars.
The Stainless Tubes:
Now, for the stainless centers within the filter housings, I had to come up with something that would be able to route the beer where it needed to go, all while being strong enough, and food safe at the same time. I ended up finding the perfect thing in a spear (dip-tube) from a commercial sanke keg that I had lying around. If you don't have any of these lying around yourself, I have seen people have decent luck acquiring them from the classifieds section at
homebrewtalk, or you may be able to get one at a local metal scrap yard for a few dollars.
Commercial Sanke Keg Spear
From one spear, I was able to cut two pieces that I would be able to use in my filter housings. And it just happened to fit perfectly snug over the filter tops (or bottoms, depending on which way you're looking at it).
The two lengths that you'll need to cut are 9 7/8" and 8" to 8 1/2".


Spear Fit on Filter
Cutting the spear: I found that the spear cut rather easily using a tubing cutter. However, it did taper the spear at the point where it was cut, which reduced the inside diameter enough so that it would no longer fit over the filters. To correct this, I had to use another tool that I had previously built for my brewery to flare the end back out. Most people will not have this tool, or any way to flare the end of the spear back out cleanly, so in that case, I would suggest using a saw to cut it to length. Just make sure to de-burr your cut afterward.
Tubing cutter, Tapered spear end, and tool used to correct taper.

Hammering this stainless reducer into the tubing corrected the taper issue.
Next came drilling the holes in the longer tubing. The idea is that the beer comes up through the filter housing on the outside of the center tubing, through your flavor infusion ingredients, and then through some small holes at the far end of the center tubing. From there, it goes down the center tube, on to the next filter housing.
Now, I will say that I have seen numerous builds where holes were drilled the entire length of the tubing, and this is not something that I would recommend. The reason being, the beer will find the path of least resistance on its way through your Randall. If you have holes near the entry point of the beer, the beer will only go through a small portion of your infusion ingredients, and ultimately, you won't get the most flavor extraction possible.
I chose to do 20 1/16" holes, starting about an inch from the end of the tube. You need to leave that space at the end, as the spear will slide over a plastic piece at the end of your housing that will block the holes if you drill too far up.
You could drill more holes if you're concerned with them clogging, but as of yet, I have yet to run anything too crazy through my Randall which may clog it. So only time will tell if I need to drill more holes.

Drilled holes in spear
The De-foaming chamber:
This one took a little bit of reverse engineering to figure out how it worked, and how to reproduce it using the cheaper filter housings.
Basically, you need to run your beer backward through the output of the filter housing. This sends the beer up the center tube instead and lets it cascade down the outside to fill the filter housing. There is a valve installed at the top which you can use to bleed out the air when first hooking up the Randall. Once this chamber is full, it gives the foam a chance to rise to the top and allows you to pull foam free beer from the bottom. This is also the reason that the filter housings MUST be used upside down when being used as a Randall!
Valve installed at top (or bottom) of de-foaming chamber

View showing center tube length in de-foaming chamber
The Valve:
Dogfish Head uses what is called an Automatic Air Vent for the tops of their Randall 3.0 (Earlier builds actually used toilet\sink supply valves). These are typically used in colder climates that use a boiler to cycle hot water through radiators to heat areas. While the automatic version may be convenient, living in Southern California proved to make it too expensive to acquire one to use in my build. So going back to the early builds and Dogfish Head using toilet\sink supply valves, I ended up finding a stainless inline shut-off valve which I used instead. To install it, I drilled a hole in the end of the filter canister just barely large enough for the barbs to fit through. Then I mixed up some good quality
epoxy and spread just enough over the barbs to coat them all the way around. While I may get flamed for using something that's not "food safe", I wasn't too concerned as the beer in the de-foaming chamber never actually gets that high up in the chamber to touch it.
Also, some of you may have noticed that I did not put a valve on the infusion chamber. I didn't feel that it was necessary, and in my tests and uses of the Randall, it has proven to not be.
Automatic Air Vent that Dogfish Head uses
Stainless inline shut-off valve that I used

Valve installed (make sure that the lever opens the valve away from the filter when installing!)
The Stand:
There's honestly a million ways to skin this cat. I chose to weld together a frame from 3/4" square tubing and pop-rivet some aluminum to it. In hindsight, I actually made it strong enough that I could stand on it! I put legs at the top and the bottom to make loading the Randall easier when it's flipped upside down. After all, it is quite hard to load it with the filter housings upside down, without making a huge mess.
The filters were pop-riveted to the aluminum sheet using generic wall brackets for filter housings. I already had one bracket lying around from a previous water filter build, and I ordered the other from Amazon
here for a few dollars.
Backside of the Stand
Stand Leg Detail
Misc bits and pieces:
I use 1/4" MFL connectors on just about everything keg related in my brewery, so this was no different. I ended up ordering two of
these stainless 1/4"NPT Male to 1/4" MFL adapters. I could've used brass just as well, but, you know, stainless....
You'll also need a 1/4" NPT pipe nipple to attach the two filter housings together. I was in a rush trying to finish the build, so I ended up picking a brass one up at my local hardware store (Remember that the outputs of the housings need to be connected together!). I'm sure you can find stainless ones online if the brass bothers you.
Outputs Together!
1/4" NPT Male to 1/4" MFL Adapter installed
What's missing?:
Some of you may have noticed that I don't have the flow control faucet or the ice chamber on my build like the Dogfish Head one has. This is because instead of going straight from the Randall to the faucet, I take a different approach and run it through a jockey box first. This has a few advantages (despite the extra cost of a jockey box!). For one, the jockey box provides enough back pressure to provide perfect pours without any extra foam even when being pushed through at 25-30psi. Second, even if the beer gets hot sitting in the Randall, it's ice cold by the time it makes it to your glass. And lastly, given that I already had a two tap jockey box, it gives me the ability to put a tee in my beer line before the Randall and run one tap through the Randall and one without. That makes it extra interesting at parties because people love to taste the difference!
One thing I would suggest when using this, though, is to keep it out of direct sunlight if at all possible. Strong UV light can still skunk your beer rather quickly through the clear filter housings.
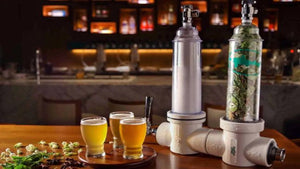
DIY Randall set up and in use. Running a Hefeweizen through mangos and pineapples.
Written by Dave Clark a.k.a. krazydave or krazydavid on most forums and social media. Feel free to
contact me with any questions.


2 comments
+1
links are broken and pictures are missing. please fix it !!!
Hello do you have the photos and/or pdf for the Randall 3.0 it looks like they are broken on the site and i would Love to see how this one is built? also the Contact Me link is broken too
https://www.maltosefalcons.com/blogs/brewing-techniques-tips/building-diy-randall-30