Frankenchiller
A recirculating water chiller that saves water and won’t terrorize the villagers!
I’ve always been a fan of efficiency in most of my endeavors, but keeping waste to a minimum has always been near and dear to my heart. I was inspired by Drew Beechum’s article “Being Water Wise” [1] and started looking at the processes in my brew shack system that demanded the most water usage. The search was brief and the culprit obvious…the tap water running through my immersion chiller!
My system is an all gravity flow five gallon type which relies on a homebuilt copper immersion chiller comprised of 50 feet of 3/8 inch tubing. Using “luke-cool” Woodland Hills water I found it taking about 35-40 minutes to cool about 6 gallons of wort, which roughly translated in about 100 gallons of water each time. I added a paddle impeller driven by a geared down motor to create a gentle whirlpool and greatly improved the “evenness” of cooling but only shaved off about eight or nine minutes and about 20 or so gallons less water.
I still wasn’t happy, so I started experimenting with running a secondary chiller coil through an ice bath prior to the wort chiller, but the extra hassle didn’t produce a significant amount of change. That’s when I decided to pursue refrigeration ideas via the internet. I found several articles describing construction of chillers for hydroponic gardens using old portable air conditioners to cool a water bath and decided that this was the path I wanted to follow.
The basic idea is to fashion a water reservoir and chill the water with the air conditioner components. Once cooled, a pump is used to circulate the cold water through the chiller coil in the substance being cooled and transfer the now heated fluid back into the reservoir to re-cool it, effectively transferring the heat out to the chiller and into the surrounding air.
Now I know just enough about physics to make me dangerous, but I do have a good base of common sense and technical skills to keep things safe. I figured that I’d need an air conditioner rated for at least 10,000 BTUs in order to have enough capacity to chill a typical batch, so I started my hunt on Craigslist. Thus began the mechanical grave robbing that I hoped would net all of the items necessary to get my desired result.
After a couple of weeks I found a unit in good working condition but missing the remote control for $50 - a good start I thought. Once I got it home I opened up all the covers, removed all of the superfluous components I didn’t need, and got down to the critical part - the evaporator. For those who aren’t familiar with refrigeration, the evaporator is the finned coil unit where all the cooling takes place (not to be confused with the other finned coil called the condenser where the heat gets dispersed). This was the scary part for this project because mishandling it and the tubing connecting it to the other components could cause a refrigerant leak - something that could end up costing twice or more what I paid for the unit to get fixed.
After examining the evaporator and the metal tubing connecting it to the compressor I decided that I’d need to build a reservoir for the cooling water out of a structurally substantial box. I figured that I could cut a slot in the side large enough to fit the evaporator through on one side and then firmly attach it without having to bend the evaporator tubing much to get it in place.
I went to one of my favorite “surplus” (read “junk”) yards (Apex Electronics in Sun Valley, Ca) and scrounged up the remains of an old aluminum hot meal tray box from an aircraft galley. Having worked on private jets during my first career, I knew exactly what it was despite the fact it was missing its doors and knew it’d be sturdy enough for the task. I got it home, filled it with water (I found it would easily hold about 12 gallons or so), and found it leaked like a sieve. I put a thin coat of epoxy inside to seal it up and then cut a large slot for the evaporator. I used plumbing “Goop” on all the mating surfaces and attached the flange of the evaporator to the side of the box with screws.
Next came the electrical modifications. I removed the fancy electronic control board and using the schematic diagram inside the unit identified the compressor and blower wiring connections for making future connections. I had an extra electronic thermal controller that I’d got for another project and set it up to control the compressor and the cooling water temperature. Being safety conscious I was happy that the machine had GFCI (Ground Fault Circuit Interrupter for shock protection) integrated into the power cord. This was important considering that there would be that potentially hazardous combination of water and electricity running simultaneously during operation.
I purchased a submersible pump from Harbor Freight and set it in my reservoir to provide the circulation through the immersion chiller and provided an electrical outlet for it on the machine (so that it would also be protected via the machine’s GFCI).
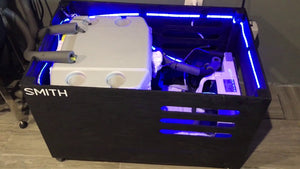
Now the chiller had its basic form - and it wasn’t pretty (see photo and you’ll agree), but I hoped it would be functional. The Frankenchiller was now alive! I set up my kettle with the maximum capacity of water and performed several test boils. I chilled each test boil using the machine and recorded my findings to look for patterns. I kept track of the kettle water and chiller reservoir temperature changes and experimented with different configurations. I ended up increasing the water quantity in the reservoir by adding a dam above the evaporator to force all of the returning water through the evaporator. This helped the numbers, but I was still not completely satisfied with the “time to cool” figures.
Another trip to Apex netted me an additional compact radiator (I think it started out life as an air conditioning condenser from a vehicle) which didn’t leak at the low pressure I was running my chiller water at. I cobbled this to the room blower I’d originally removed from the air conditioner and plumbed it to the hot output from the immersion unit. The idea was to strip off the excessive heat at the beginning of the cooling process and allow the reservoir to provide cold water to the immersion unit for a longer period of time and stay ahead of the heat curve.
I ran a couple more test runs and was satisfied with the results and determined it was time to test it with wort this time! I ran a typical batch for my system (about five and half gallons or so at flameout) and went from boiling to an ale temp of sixty nine degrees in about 16 minutes. I was very happy with that drop rate and even happier because I could drain the ten gallons of cooling water out of the Frankenchiller back into two covered 5 gallon buckets and keep it for the next several runs! The net result has meant a savings in water usage of at least 80 gallons per batch.
The upshot of the Frankenchiller is that it can be used as a supply for immersion or plate chillers. This was an “engineer as you go” kind of project and there were many different hurtles to overcome during the process, but the results were worth it. I’ve skipped a number of gory details and charts to spare the “technically uninterested” reader, but would be happy to share any data with those interested. I’m hoping this article will inspire others to continue the conservation efforts as Drew’s piece inspired me.
Chris Downie
P.S. I'd be happy to share any details or brainstorm ideas with anyone interested in building one for themselves. Message me on the Falcons website at my user name "DB-Ltd" and I'll exhange email addresses. - Chris
[1] “Being Water Wise”, Drew Beechum 1/18/2014, Maltose Falcons Website, Tips & Techniques - Techniques
| Attachment | Size |
|---|---|
| 97.1 KB | |
| 268.16 KB |