Racking with CO2
You've made your beer and lovingly attended to the fermentation and have had the patience to let it settle out. But unless you have had the foresight to leave your beer in a location with plenty of height for siphoning or draining, you have to move the carboy for racking.
Not only is that carboy heavy and potentially dangerous if dropped, but you run the risk of knocking off the airlock and you are definately going to stir a bunch of your trub and nicely compacted yeast mass back into solution.
Fortunately, there's an easy solution if you're a homebrewer who kegs your beer. You can do something very similiar to what the pros do and use pressure to transfer your beer. Unlike professional brewers though, who use CO2 to assist in priming their transfer pumps, we'll be using CO2 to drive the whole process. Once you've figured out the right balance, you can rack a beer in about 3 minutes.
WARNING: Carboys are NOT pressure vessels, so the following procedure is potentially dangerous. You increase the chances of shattering a carboy as you increase the pressure being used for racking. It is imperative that for maximum safety that you use low pressure and that you prevent clogs in the racking mechanism.
Parts List
| CO2 Tank with a 1/4" Flare nut | Sounds daunting, but really this is just a CO2 tank with the typical homebrew setup for use with quick disconnect fittings, not barbs! |
| 2 Port Carboy Hood | This is one of the tight fitting rubber hoods for carboys that have a long angled off port. Generally sold in 2 different sizes both fitting different types of carboys. (Note in the pics below there is a maroon hood for the 7 gallon screwtop carboys and an orange hood for 6.5 gallon and 5 gallon carboys) To see a lousy closeup of one of these hoods with the barb look here. |
| SS Racking Cane (and tubing) |
It's not absolutely necessary to use a stainless racking cane, but they do work better in the longer run. Plastic racking canes tend to crack over repeated use with pressure or exposure to hot chemical solutions like PBW. |
| 1/4" Flare Post to Barb fitting. | This barb adapter allows you to screw your CO2 tank onto the hood. The fitting will insert barb side first into the angled port on the hood. To see the barb assembled with the hood look here. |
Assembly Instructions 1) Take your new carboy hood, and give it a quick rinse and soak in hot water. Doing this will allow the hood to soften a bit for inserting the barb adapter
2) Insert barb adapter into the angled off port. This should fit snugly into the port without a lot of free twisting. If you want to insure fit, use a small worm screw clamp to lock the fitting in place. Racking System Hood Closeup

3) Push the racking cane through the center port of the carboy hood. This connection might be a little looser than the barb fitting, but it should be fairly snug as well. If it's loose, you can clamp it down, but that loses you a lot of flexibility. Get a fatter racking cane if necessary.
4) Attach your tubing and other accessories and you are done. The final product should look similiar to this Assembled Racking Cane

Racking Instructions
1) Place the hose of your clean and sanitizing racking setup into the receiving vessel. [A keg in the pictures here]

2) Fit the carboy hood and racking cane into the carboy. Position the racking cane so that it sits a bit above any sludge in the bottom. Fit this on tightly and let the cap naturally snap over the mouth of the carboy. Don't cinch or secure this cap onto the carboy with another mechanism. If you run too much pressure into the carboy, the hood can pop up. This serves as first line of defense against bursting the carboy.

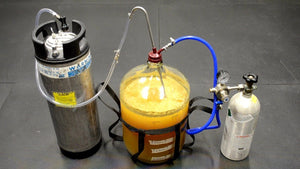
3) Take your gas line and screw it onto the flare fitting. Stepping back, you should now have something that looks like this:
4) Set your gas regulator to ~3 p.s.i. DON'T GO ABOVE 5 P.S.I.

5) After checking that all clamps on your racking setup are open, slowly turn on the gas pressure and watch the beer flow!
Racking - 0 Minutes Elapsed

Racking - 1 Minute Elapsed

Racking - 3 Minutes Elapsed
Notice the bubbles in the line and how there's only a little beer left in the carboy
6) As you approach the end of the racking you can turn off the gas. Once the liquid is exhausted, CO2 will start to vent through the racking cane. To stop this, completely shut off the gas supply and pop the cap off the carboy. Now you're completely done!
Racking System - Assembled for Use
Optional Parts and Thoughts: With the relatively wide availability of PSP type quick disconnect fittings these days, I'm seriously thinking of replacing all the flare fittings for my gas system. That would certainly make it easier to swap a gas bottle around for different purposes.
If you're worried about using all this gas for transferring beers (gas is cheap here), you can also use this same technique for foolproof siphon starts. Just set the carboy up as you normally would for a siphon. Hook the gas up and give it a quick shot to start the flow. Disconnect the gas and you're finished. DON'T USE YOUR MOUTH TO BLOW INTO THE CARBOY. THAT'S JUST INVITING ALL SORTS OF LOVELY GERMS INTO YOUR BREW!